| |
The See-tab brings together all the options that affect the visual aspect of cursor customization and
other features. Most of these are global options that affect any cursor customization currently active.
|
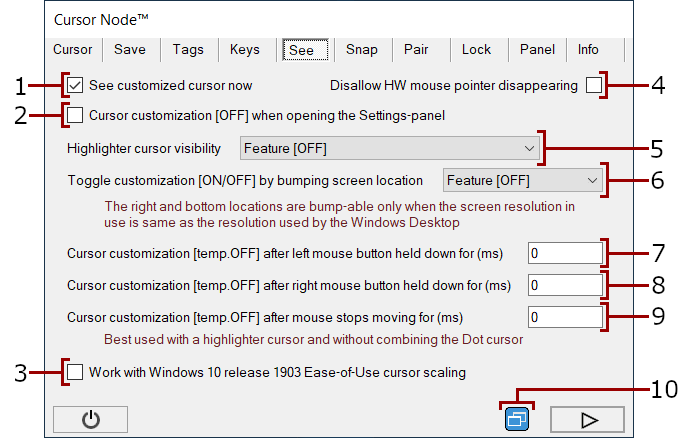
- Live state of cursor customization: ticked is customization shown, unticked is customization not shown.
- Global option for turning OFF cursor customization on opening the Settings Panel.
- Global option to reduce conflict with Windows 10 cursor scaling.
- Global option to disable the ability of programs to hide the hardware cursor. For example, the Windows Notepad hides the cursor while text is being typed. Useful for showing the hardware cursor in a game that uses software cursor. May not work for all programs.
- Option to control highlighter visibility relative to the visibility of the hardware cursor. This option is specific for each cursor save and cursor style.
- Global option to toggle the ON and OFF cursor customization by bumping the screen edge. To bump an edge, move cursor to the edge.
- Global option for turning OFF cursor customization after the left mouse button is held down for the specified number of milliseconds.
- Global option for turning OFF cursor customization after the right mouse button is held down for the specified number of milliseconds.
- Global option for turning OFF cursor customization after the mouse is not moved for the specified number of milliseconds. Maybe helpful for the visually impaired.
- Option for changing the Topmost state of windows.
Windows cursor scaling
Windows 10 release 1903 introduced cursor scaling as part of the Ease of Use facility. If CursorNode is used
while the cursor scaling is active, then a conflict would result because both CursorNode and Windows
are manipulating the cursor. This produces incorrect custom cursor size in some programs, notably in the
Windows Start menu. It is a good practice to only use one cursor enhancing program/system at a time to avoid
this kind of problems. The 'Work with Windows 10 release 1903 ..." option in the See-tab disables cursor
customization in programs that are prone to be affected by the conflict. This makes cursor customization
appear more jarring. The option should not be used unless the Windows cursor scaling is actually in effect.
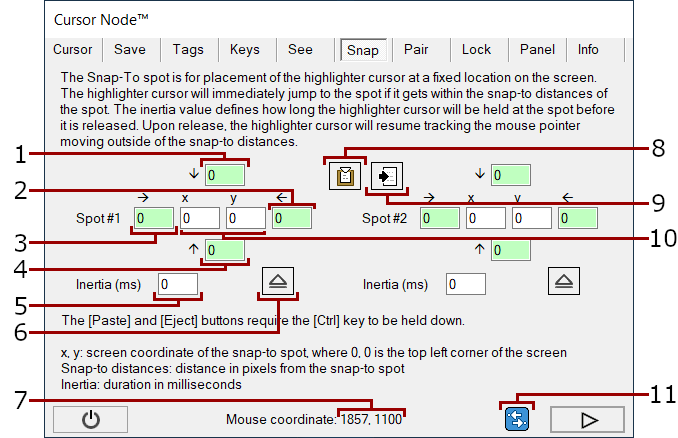
The Snap-tab is for making a custom reticle for use in a first-person shooter game. This feature is useful
if the original game reticle is difficult to see because of size, color, or some other issues. The custom reticle overlays the
game reticle without replacing it. The custom reticle is made from a CursorNode highlighter by snapping it
to fixed positions. The snapping action is accomplished using snap-to spots. The custom reticle is suitable
for a game that has one or two permanently fixed reticle positions. The game may have to run in windowed or
windowed-full-screen mode to be compatible with the highlighter-based reticle. The values defined in the
Snap-tab are specific to each cursor style and customization save.
|
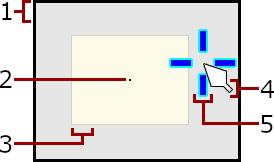
- Top boundary of the area controlled by the snap-to spot, specified in number of pixels above the snap-to spot.
- Right boundary of the area controlled by the snap-to spot, specified in number of pixels to the right of the snap-to spot.
- Left boundary of the area controlled by the snap-to spot, specified in number of pixels to the left of the snap-to spot.
- Bottom boundary of the area controlled by the snap-to spot, specified in number of pixels below the snap-to spot.
- Inertia time. The number of milliseconds before the custom reticle resumes tracking the hardware cursor after a snapping action. The resumption is only possible if the hardware cursor is outside of the area controlled by the snap-to spot.
- Eject button for resetting the snap-to spot to disabled state. Must be clicked while holding down [Ctrl].
- Display of current mouse coordinate, with low rate of refresh
- Copy button for copying the snap-to spots.
- Paste button for pasting the copied snap-to spots into another cursor style or customization save. Must be clicked while holding down [Ctrl].
- Screen coordinate of the snap-to spot. The top left corner of the screen has a coordinate of: x=0, y=0.
- Feature for setting the snap-to spot coordinate to the current mouse coordinate.
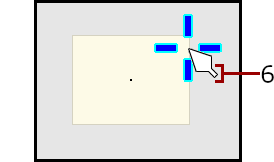
Snapping area
The snapping area controlled by a snap-to spot is what triggers a snapping action. The snap occurs as soon as
the hotspot of a CursorNode highlighter enters the area. Each subsequent move of the hardware cursor inside the
area also causes a snap. The snap forces the highlighter's hotspot to align
with the snap-to spot. While snapped, the highlighter ceases to move like a cursor and takes on the characteristic of a
reticle. The highlighter resumes tracking the hardware cursor once the Inertia time expires, and the hardware
cursor is moving outside of the snapping area. The inertia count down begins anew on each snap. If
the snapping area covers the entire screen, then the highlighter will never unsnap and becomes a permanent
reticle at the snap-to spot. If both of the snap-to spots are active and their snapping areas overlap, then spot
#1 has precedence.
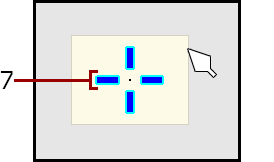
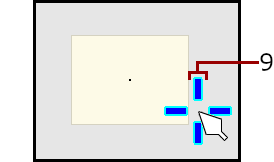
- Screen
- Snap-to spot, represented here with a dot. In actual use, the snap-to spot is just a screen co-ordinate and has no visual presence.
- Snapping area controlled by the snap-to spot
- Game/app hardware cursor moving outside of the snapping area and unaffected by it
- Highlighter moving like a cursor while tracking the hardware cursor

Snap !!
- The game/app hardware cursor entering the snapping area resulting in a snap action for the highlighter
- The snapped highlighter. It stays at the snap-to spot and behaves like a static reticle.
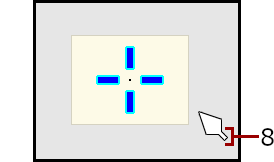
Unsnap
- The game/app hardware cursor left the snapping area. If it stays out of the area for a period longer than the inertia time of the snap-to spot, then the snapped highlighter is released from the snap-to spot.
- The unsnapped highlighter resuming tracking the hardware cursor and behaving like a cursor once again
|
|